Thanks for visiting the mural update page! I created this site so my friends and family can view the progress of this project throughout the summer and fall.
Click on the photographs to enlarge.
The Story:
Two years ago, the owner of Shipley's Tavern had an idea that he wanted a mural painted on the outside wall of his building. He told this to one of my business professors at Hanover College, and as I was doing an internship in Louisville with a professional muralist at the time, she recommended me for the job. The owner, Cris, and I got in touch and began brainstorming about how to go about the project. Planning got put on hold for a while as I finished school. May of 2008, I graduated from college, found a place to stay with my Studio Art professor, and started putting the pieces together to successfully complete a huge outdoor mural on a wall made of re

ally old bricks.
Since then, during the past year, I have done research on outdoor murals and historic preservation, raised thousands of dollars to pay for costs and materials, and figured out every little detail : where to get scaffolding, who to ask to repair the holes in the crumbling wall, whose permission I need to paint an historic building, what kind of liability insurance I need, and on and on. It's been a long process. For the Most Fun prize, I would vote for throwing a benefit concert, Steamboat Songs for the Soul, where 5 of my friends' bands played music all night while everyone danced, and we raffled off a special spot on the mural, where the winner got to choose a scene of Madison to go on the mural with their name next to it. (A little boy won, and he chose the Regatta boat race.) For the Least Fun prize, I would vote for the never-ending labyrinth of insurance.

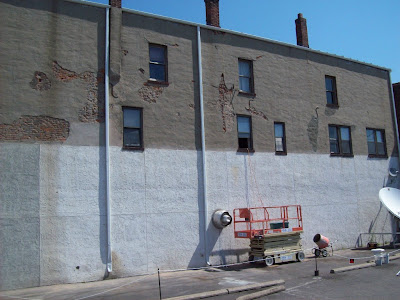
What I have mentioned here only skims the surface of all the questions, meetings, decisions, and brainstorming sessions that have happened over the past year. But as of today, the first step of the Realized Mural (meaning the mural that exists in real life) as opposed to the Theoretical Mural (the one that exists in idea and extensive planning stages only), is completed! Last Friday, I made my first monthly deposit on the scissor lift, had it delivered to the Wall, and a contractor who I hired began knocking off the loose parts of the parge coat (a layer of mortar mix that was applied years ago over the old, crumbling brick... I learned that term from my consultant, Rusty- thanks, Rusty!) and patching it. The parge coat covers the top 1/2 of the wall, and quite a bit of that section came down in big chunks. Better now than after it's painted, that's what I say! The contractor, who owns Kickin' Ash Chimney Service, used a cement/stucco mix to patch the holes up. The following photos show the fabulous job he did. Now it needs 48 hours to cure, and it'll be ready for light power-washing, then priming with a block-filler.
The scissor lift is a little intimidating. When it was first delivered, it wouldn't go up over 10-15 feet because of the incline in the parking lot. The lift has a sensor that disables it if the ground is uneven, so it won't tip over. That's a nice feature. I called the rental company and they brought me some sections of 2x4's to prop up the 2 wheels furthest from the wall. It works just fine shimmied up like that, and the Kickin' Ash contractor, David, showed up just as I was about to go all the way up for the first time. So we went up in it together, and I'm glad he was with me! I was doing the controls (it's like a joystick with levers and buttons), and we got up about 30 feet before I had to take a break.... then slowly we went up 10 more feet, and we could see up on the roof. I won't have any problems reaching the top of the wall, that's for sure. And I think once I get used to the height and the swaying to and fro with the breeze, I'll begin to appreciate the view.

If it quits raining, maybe the cement patches will dry and we'll be on to the next step! I'm itchin' so bad to start painting this mural - if I didn't care about making it last, I'd be up there right now painting it! The only reservations I have are probably these three:
1. The lift scares me a little... but not enough to admit it.
2. I need to be very focused when I paint, because every week I have the lift in my possession is another $200, and every month is $800. This is to be a timely project!
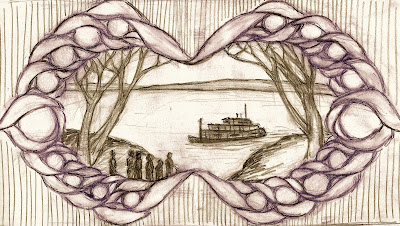
3. I can't seem to commit to a final design. Every time I come close to settling, something in my gut screams out, "Wait! It could be so many different things, there are so many different ways you could design this... and you want to settle on that?!?!"
I think I would feel differently about #3 if I'd had the chance to just jump in and paint the dang thing, but all this waiting and planning has got me into over-contemplation mode. But my dad reminded me that once I'm actually painting, the whole thing will take on a life of its own, and then I'll barely be able to hold back. It will just create itself. I'm not sure how my dad knows that will happen, because he's not an artist, he's a lawyer... but he's right. Maybe going to trial is like creating a work of art.


 They helped me measure out each grid square (Annie):
 Figure out how the heck to work the scissor lift (Isaac):
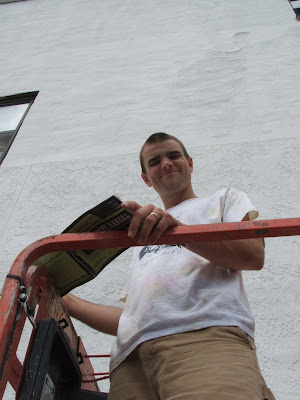 And of course keep hydrated (Erin):


 First stroke of color!


 At this point, passers-by were shocked and confused by the painting, asking what I was doing and what the heck this was a painting of.... is it abstract art? Is it a rope, a chain, a big pretzel, a dragon, the large intestine? I just told them to wait and see!
 Figure out how the heck to work the scissor lift (Isaac):
 And of course keep hydrated (Erin):

 The primer is a masonry sealer and block filler in one, so they worked it in with rollers and brushes to smooth out the rough texture of the wall. Hopefully this will help paint to go on smoother, and save my paintbrushes from going bald. They ran out of primer, though, so we've got to get a few more gallons... and then they're going to put a coat of weather-bond-something-or-other to seal the primer before I can paint over it.


